Showing posts with label dessert. Show all posts

Delicious Donuts

I know, I know, I suck at updating. I promise this post will make up for it!
On the plus side, my early summer class is over. Now I'm in a practicum. So far I have worked quite a few VERY early shifts at my school's bakery. I am learning quite a few skills to aid in my baking. For instance, I successfully iced my first cake today! I can't wait to show you guys my skills!

I have a few things I want to tell you before I get started on the recipe posting.

First of all, I've started a natural allergy elimination program called NAET. It's quite hard to explain but it involves kinesiology, muscle testing, and energy pathways. I'm only a few sessions in so it's tough to know if it's working. But I definitely feel something. I will keep you guys updated on it.

Second of all, MTV's True Life did an episode called "I'm Allergic To Everything." In the episode, the boy Zeke had my condition, Eosinophilic Esophagitis. I love that MTV is spreading the word on allergic conditions. It's already raised so much awareness. The girl, Raelyn, has idiopathic anaphylaxis, which is when reactions aren't triggered by specific foods. She actually participates in the same treatment I am, NAET. To watch the full episode, read a summary, or watch a recap, check out this website.

Third of all, my blog is now launched in a mobile version! Check it out on your cellphones and tell me what you think!

Fourth of all, if any of you are pregnant or planning on becoming pregnant, I stumbled upon a little information in the Vitamin Shoppe's magazine, Amazing Wellness. If you have allergies and are trying to prevent your baby from having them as well, I have a few tips for you. I read that to strengthen your baby's immune system during childhood and adulthood, breast feed exclusively for 6 months. It protects a baby for at least 12 months. It also says that digestive problems, allergies, and infections are common. I also read that taking Vitamin D while pregnant decreases infections and allergies in babies. So try out that Vitamin D and take some prenatal supplements such as DHA and a multivitamin.

Okay, I'll get off my soapbox now.
After wandering the cooking isle at Hobby Lobby (did you know they had one!?), I discovered a donut pan. I decided to hold off and make sure I wanted it. Well, I sure did. I went back for the pan and got to baking all types of donuts. I tried glazed, chocolate, and cinnamon sugar. They were AWESOME! So here is the recipe. Feel free to bake them if you have a donut pan, but personally, I think frying tastes better!

This recipe comes from Babycakes Covers the Classics by Erin McKenna. It's pretty awesome.


Donuts: Dairy, egg, soy, nut, fish, and wheat/gluten free.

Makes 12.

Ingredients:
  • 1/3 cup melted refined coconut oil or canola oil
  • 1 cup vegan sugar
  • 3/4 cup white or brown rice flour
  • 1/3 cup garbanzo and fava bean flour
  • 1/2 cup potato starch
  • 1/4 cup arrowroot (or tapioca if you don't have any)
  • 1 1/2 teaspoons baking powder
  • 1/2 teaspoon xanthan gum
  • 1/2 teaspoon salt
  • 1/8 teaspoon baking soda
  • 6 tablespoons unsweetened applesauce (about one applesauce cup)
  • 1/4 cup vanilla extract
  • 1/2 cup hot water

Directions:
    
    Glazed and Chocolate
    
  1. Preheat oven to 325 degrees F. Brush 2 six-mold donut trays with coconut/canola oil and set aside.
  2. In a medium bowl, whisk together the sugar, flours, potato starch, arrowroot, baking powder, xanthan gum, salt, and baking soda.
  3. Add the coconut oil, applesauce, vanilla, and hot water and continue mixing with a rubber spatula just until the ingredients are combined.
  4. Using a melon-baller or tablespoon, drop 2 1/2 teablespoons of batter into each donut mold. Using a toothpick, spread the batter evently around the mold.
  5. Bake for 8 minutes, rotate, and continue to bake until the donuts are golden brown, about 7 minutes more. Let cool in the molds for 5 minutes if sprinkling with toppings such as cinnamon sugar, or 15 minutes if using glaze or icing. Run a knife around the donuts in the molds, lift them out, and place them on a baking sheet. Coat them in your choice of topping.


To fry: Fill a pot with canola oil, a few inches deep (enough to cover the donut). Heat it up until it reaches 360-370 degrees F (medium high heat). You can either use a donut cutter or cookie cutters to cut donut shapes or just ball up the dough to make donut holes (which I find to be easiest). The donuts grow quite a bit larger when fried so make sure to start small (slightly bigger than a quarter). Carefully ease the donuts into the pan (it's easy to splash so use tongs or a spoon). Fry the donuts until the outside is nicely browned. Make sure all sides are browned. Remove from oil. Wait a few minutes and make sure the inside is completely cooked, otherwise turn down the temperature and cook longer. If the donuts darken/burn too quickly, the inside will be too doughy.

Vanilla Sugar Glaze:
In a small bowl, combine 3 cups powdered sugar, 1/3 cup hot water, and a teaspoon of vanilla extract and whisk briefly. If the glaze is too thick, add warm water one tablespoon at a time until the icing reaches a thick yet slightly runny consistency. If it becomes too runny, add more powdered sugar 1/4 cup at a time. The glaze can be stored in an airtight container at room temperature for up to 4 days. [What I ended up doing is using less powdered sugar and rice milk instead of water otherwise the powdered sugar flavor is overwhelming]

Chocolate Sugar Glaze:
I ended up making half of the donuts glazed and half chocolate. So to not waste ingredients, I added about 1/4 cup of cocoa powder to the remaining vanilla glazed icing and mixed well. In the book, it calls for 1 cup vegan, soy-free chocolate chips (like Enjoy Life), 2 tablespoons melted refined coconut oil or canola oil, and 1/2 teaspoon salt. You can heat all that together in the microwave, but I find my version works well.

Cinnamon Sugar Topping: Mix 3/4 cup vegan sugar and 2 teaspoons of cinnamon together. Either "dip" the donuts in the sugar or put a few in a paper bag with the cinnamon sugar.


What I thought: I love love love donuts. These were delicious, but I was somewhat disappointed that they didn't taste exactly like donuts you get at the store or bakery. They are different, but not in a bad way. Try them!! But let me warn you - DO NOT EAT OR SMELL THE BATTER. It tastes and smells like beans. It's nasty. But once you cook them, it's much better. I made this recipe baked, but I have tried another recipe fried and it was better that way. I even fried up one of the baked ones I made, and it was even better! So fry them. I like all of the toppings but the chocolate glaze (vanilla glaze with cocoa powder) was my favorite.

Enjoy!

-Michelle

  • Digg
  • Del.icio.us
  • StumbleUpon
  • Reddit
  • RSS

Butter Cups

Hey all!
As promised, I'm here to tell you about my allergy test results. I was tested for a number of fish, shellfish, tree nuts, seeds, citrus fruits, beans, spices, and vegetables. I'm happy (and sad) to say that I didn't react to ANY of them! Which is good and bad. Good because I don't have to eliminate any more foods. On the bad side, I am still having reactions and we're not sure why. It could be slightly due to my seasonal allergies or some other hidden food allergy. I've noticed that I hurt after chips and salsa, but I'm not sure what I could be allergic to in them (I've been tested for corn, tomatoes, and onions already). So I'm just gonna stay away from that and see how I feel.

So as some of you know, this coming week is Food Allergy Awareness Week. Even less of you know that the week after is National Eosinophilic Awareness Week aka NAEW.
If you have read my introduction and Attack of the Peas post, then you'll know that I suffer from Eosinophilic Esophagitis. Now what the heck is that? It is an immune disorder similar to an allergy. When I eat foods I'm allergic to, eosinophils, a type of white blood cell, build up in my esophagus. They cause it to become inflamed which causes a lot of pain. Then it becomes too inflamed and I have a muscle spasm. But for other people with EE, this is the least of their problems. A lot of kids are allergic to almost every food and some kids have such severe dysphagia, which means their esophagus is so rigid and tight, that they can't even swallow anything. Many kids with EE survive on purely a feeding tube. This disease is so new that doctors don't understand it yet. They don't know what causes it, why only some people get it, or how to fix it. There is no cure or even a treatment. Most kids like me are on an inhaled corticosteriod for ASTHMA that they have to somehow "swallow." It's incredibly stressful and upsetting. So during NEAW I'm going to be spreading awareness and I hope you will too. I'm going to be updating what I'm doing and sharing some stories of other people with EE. I hope you will all better understand EE and be more sympatheic for children with disorders such as ours.

Has anyone heard of or tried NAET (an allergy elimination technique)? My coworker has a number of food allergies and has participated in NAET and is pretty much cured. I am wondering if anyone else has tried it or even if it would work in people with EE. I'd love to have your feedback on this or any other technique!  Because I can't imagine living my whole life in pain every day while still having to avoid all these delicious foods.

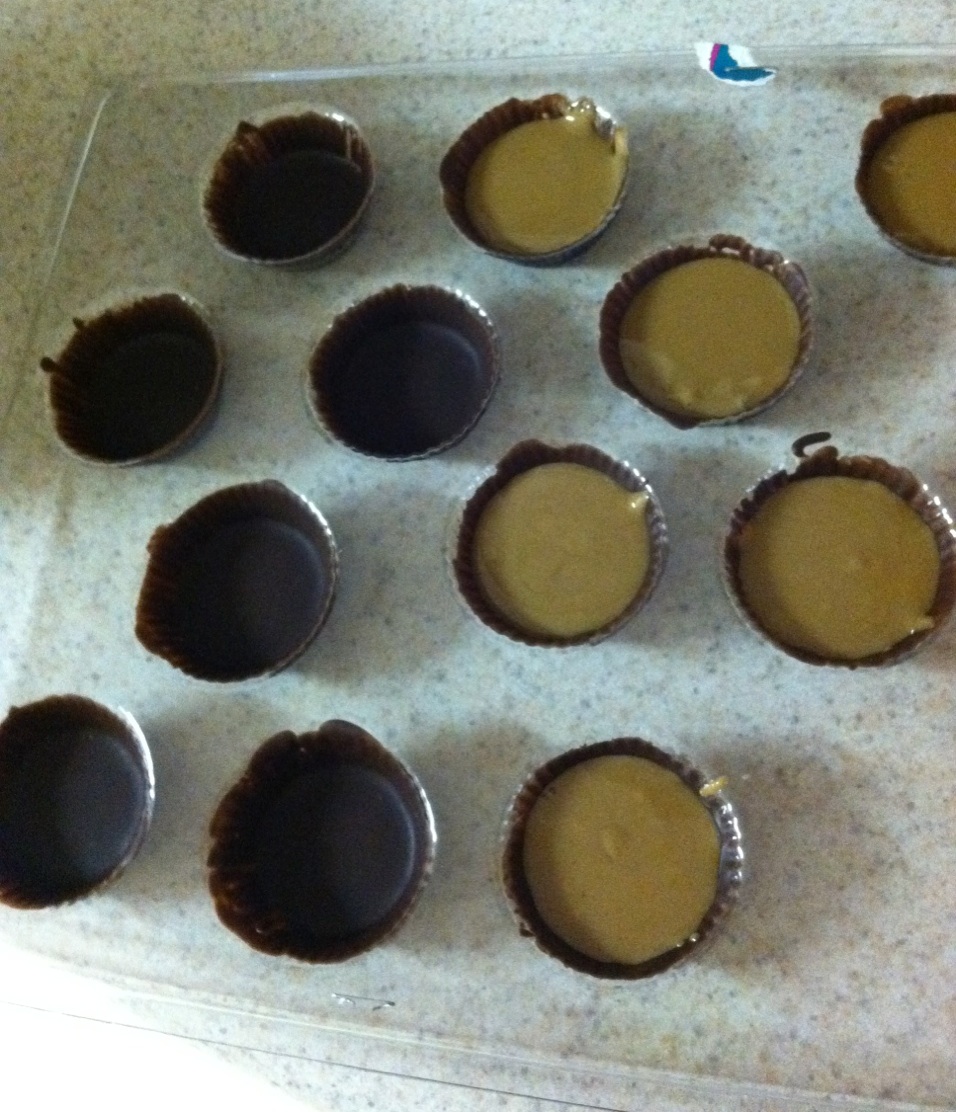
Last but not least, I made an alternative to Recess peanut butter cups! I was at Hobby Lobby and stumbled upon the best cooking aisle ever! I found peanut butter cup candy molds and was ecstatic! They're easy and super delicious.
I tried two different versions. One was with almond butter and the other was with sunflower seed butter. I've gotta admit that the sunflower seed butter was better but they were both delicious.

Butter cups: Dairy, eggs, soy, peanuts, fish, and gluten/wheat free.
 It can be tree nut free too depending on the filling used.

Ingredients:

  • Enjoy Life semi-sweet chocolate chips (or the rice milk chocolate bars) - about a cup depending on how many you want to make
  • Almond Butter - about 1/3 cupOR
  • Sunbutter or other sunflower seed butter - about 1/3 cupOR
  • another "butter" of your choice - about 1/3 cup

Left: before filling. Right: after filling
Directions:
  1. Melt the chocolate chips in the microwave using a microwave safe bowl.
  2. Transfer some chocolate into the mold. I used a brush/glazer and a spoon. Coat the bottom of the mold about 1/4 cm thick. Make sure to get the sides too.
  3. Freeze for 3-5 minutes to allow the chocolate to harden. If the sides are too thin still, they will fall apart when you're removing the chocolates. So coat the sides again and freeze them again.
  4. Spoon a small amount of the "butter" into the center of the molds. Make sure you leave enough room for the chocolate topping, about 3 mm from the top.
  5. Transfer melted chocolate to fill the cups to the top.
  6. Freeze for about 15 minutes.
  7. Remove from molds and eat!

What I thought: These were super delicious! Like I said before, I like the sunflower seed butter ones better but these were a great alternative to Recess. These were super easy, but somewhat messy. But super tasty!

Enjoy!

-Michelle

  • Digg
  • Del.icio.us
  • StumbleUpon
  • Reddit
  • RSS

Banana Cupcakes with Maple Brown Butter Frosting

Hey everyone!

Guess what!?? When you Google "flourless chicken tenders" my blog is the #1 top link out of 31,900 results! It totally made my day. So THANK YOU to every reader. And please please please give me feedback!

So this is my first ever recipe modification! What I did was I took a normal recipe and adapted it for food allergies.


Ming's Cupcake
 If any one of you has every used StumbleUpon and has "liked" many recipe websites, you've stumbled upon Ming Makes Cupcakes. Well, that's what happened to me. I stumbled upon her website and fell in love with every cupcake; they all look so tasty!
I had my eye on Cupcake 6: the banana cupcakes with maple brown butter frosting. Doesn't it just sound delicious!? So I decided I wanted one.
At this point I've baked enough to know some pretty good substitutions, so I substituted the milk, eggs, and gluten flour and this is what I got: (Oh yeah, I forgot to mention how fan-freaking-tastic it is)

So what I'll do is write out the original ingredients and next to it I'll put what I used if I changed it.

Banana Cupcakes with Maple Brown Butter Frosting: Milk, egg, soy, nut, fish, and gluten/wheat free.

Cupcake Ingredients:
  • 1 cup mashed bananas (I think it's about 3 bananas)
  • 1 tablespoon lemon juice (I used a tablespoon of maple syrup instead)
  • 1 1/2 cup flour (I used the mix that I always use: 6 cups = 2 cups brown rice flour, 1 1/3 cup potato starch, 2/3 cup tapioca flour/starch or you could use arrowroot powder if you can't have tapioca. Because it's gluten free you'll need about 1/2 teaspoon of xanthan gum)
  • 1 teaspoon baking soda
  • 1/4 teaspoon salt
  • 3/4 stick butter (I used Earth Balance Soy-Free Buttery Spread)
  • 1 cup sugar (I used cane sugar)
  • 1 jumbo egg (I used 1 1/2 teaspoons of Ener-G's Egg Replacer mixed with 2 tablespoons of rice milk
  • 1 teaspoon vanilla
  • 3/4 cup buttermilk (just used 3/4 cup rice milk)
  • (I decided to add in some nutmeg and cinnamon too. I just added it until I liked how it tasted. Probably about 1/2 teaspoon each... possibly close to 1 teaspoon each)

Icing Ingredients:
  • 1 stick butter (I used 1/2 cup of Earth Balance Soy Free Buttery Spread)
  • 3 cups confectioner's sugar (I used powdered cane sugar)
  • 1/4 cup milk (I used rice milk)
  • 3 tablespoons maple syrup (make sure it's the real stuff!)
  • (I also added in some nutmeg and cinnamon to the icing. The nutmeg was a must!)

Cupcake Directions:
  1. (It doesn't include it in the directions, but PREHEAT!)
  2. In a small bowl, combine bananas and lemon juice (or in my case the maple syrup).
  3. In a separate bowl, mix together flour, baking soda, and salt.
  4. In another bowl, cream butter and sugar until light and fluffy.
  5. Beat in egg (or egg replacer mixture) and vanilla.
  6. Add flour mixture and buttermilk (I just used rice milk) alternately while mixing.
  7. Beat in bananas and mix until well blended.
  8. Bake at 275 degrees F for one hour or until inserted toothpick comes out clean.
  9. After removing from oven, place in freezer for a half hour (not necessary).

Icing Directions:
  1. In a saucepan, melt butter at medium temperature until golden-brown (or you could just do this in a microwave).
  2. In a bowl, add butter to sugar, then add milk and syrup. Beat until smooth.
  3. Top with bananas and a sprinkle of cinnamon.

What I thought: These might be the best things I've ever made, seriously! My friends couldn't get enough of them. They were hesitant at first when they heard allergy-free but went back for seconds and thirds! So pretty much you should make these. BUT, the icing did appear to be quite runny. I think next time I'd probably use non-melted vegetable shortening to make it thicker. But still it was sooo good. Definitely add nutmeg to taste. And don't leave out the icing; it's the best part!

Enjoy!
-Michelle

P.S. Check out Cybele's website! She has tons of allergy free foods and has written two books, both of which I LOVE!

  • Digg
  • Del.icio.us
  • StumbleUpon
  • Reddit
  • RSS

Golden Agave Cupcakes

Hey all! Once again, I'm sorry I haven't been able to post a recipe! I've been doing midterms and working a ton. AND MY MIXER BROKE!
And my boyfriend and I's one year anniversary was a week ago. Also, my 21st birthday is this Wednesday! [Not making excuses or anything, just pointing out how busy I've been!]

Today I'm posting Golden Agave Cupcakes from The Allergen-Free Baker's Handbook by Cybele Pascal. You can use it with any icing, but I was out of confectioner's sugar so I made the Rice Milk Chocolate Ganache. My roomates and I also tried them with just agave nectar or honey on top and those were even better than the ganache!

Golden Agave Cupcakes: Dairy, eggs, soy, nut, fish, and wheat/gluten free!

Makes 12 cupcakes.

Ingredients:

  • 2/3 cup rice milk
  • 1 teaspoon cider vinegar
  • 1 1/2 cups Basic Gluten-Free Flour Mix (6 cups=4 cups brown rice flour, 1 1/3 cups potato starch, 2/3 cup tapioca starch/flour)
  • 1/4 teaspoon plus 1/8 teaspoon xanthan gum
  • 3/4 teaspoon baking soda
  • 1/2 teaspoon double-acting baking powder
  • 1/4 teaspoon salt
  • 1/2 cup dairy-free, soy-free vegetable shortening (I like Spectrum's)
  • 2/3 cup agave nectar
  • 1 1/2 teaspoons pure vanilla extract
Directions:
  1. Preheat the oven to 350 degrees F. Line a muffin pan with 12 liners.
  2. Combine the rice milk and cider vinegar. Set aside.
  3. Whisk together the flour mix, xanthan gum, baking soda, baking powder, and salt.
  4. In the bowl of a stand mixer fitted with the paddle attachment, cream the shortening on medium speed for about 1 minute. Add the agave nectar and vanilla and beat for 2 minutes more, or until combined.
  5. Sift in the dry ingredients in three batches, alternating with the rice milk mixture, beginning and ending with the dry ingredients. Beat until smooth, about 30 seconds, scraping down the sides of the bowl as necessary. Fill the liners about half full.
  6. Bake in the center of the oven for 18 minutes, or until a lovely golden color, rotating the pan halfway through.
  7. Transfer the cupcakes to a cooling rack and let cool completely before frosting.

Ganache Ingredients:
  • 4 Enjoy Life Rice Milk Boom Choco Boom bars or 1 cup dairy-free, soy-free chocolate chips (I used Enjoy Life "chocolate" chips)
  • 1/4 cup rice milk
  • 2 tablespoons agave nectar (or maple syrup)
  • Pinch of salt

Ganache Directions:
  1. Chop the chocolate bars into small pieces using a serrated knife (if you use them).
  2. Bring the rice milk to a simmer in a small saucepan over medium-high heat. Remove the pan from the heat and stir in the chopped chocolate, agave nectar, and salt.
  3. Whisk until smooth, about 1 minute. Let cool to room temperature before spreading or drizzling on cupcakes.


What I thought: These were pretty good! My roomates liked them better than I did; I don't think they were the best I've made. And my roomates also preferred the agave nectar drizzled on top instead of the ganache. But overall they were pretty tasty!

Enjoy!
I'm also going to start making up my own recipes, so if anyone has any tips, let me know!

-Michelle

  • Digg
  • Del.icio.us
  • StumbleUpon
  • Reddit
  • RSS

Chocolate Thumbprint Cookies

Ever since I was a kid, one of my favorite cookies has been chocolate thumbprint cookies, which are sugar cookies with the Hershey kiss pressed in the center. Finding out I had food allergies was hard, knowing I had to eliminate chocolate... until I discovered Enjoy Life's rice milk chocolate. So these are a classic twist on the original Hershey kiss ones. Still a sugar cookie but with and indentation for melted chocolate in the center.

This recipe is from The Allergen-Free Baker's Handbook by Cybele Pascal, which is actually my handbook. I love love love it.

I also wanted to know what you guys thought of my "What I Used" section in each recipe, the one where I list the brands I used. Is it useful or pointless? I include the pictures of the ingredients I use, so is that enough? It just takes forever to type it all out. Just let me know what you guys think.

Chocolate Thumbprint Cookies: Dairy, eggs, soy, nut, fish, and wheat/gluten free.

Makes 24 2-inch cookies.

Ingredients:

  • 1 1/4 cups plus 1 tablespoon Basic Gluten-Free Flour Mix (6 cups = 4 cups brown rice flour, 1 1/3 cups potato starch, 2/3 cup tapioca flour/starch)
  • 1/4 teaspoon plus 1/8 teaspoon xanthan gum
  • 1/4 teaspoon plus 1/8 teaspoon baking soda
  • 3/4 teaspoon cream of tartar
  • 1/8 teaspoon salt
  • 1/4 cup plus 2 tablespoons dairy-free, soy-free vegetable shortening
  • 1/4 cup plus 2 tablespoons granulated sugar
  • 3 tablespoons firmly packed brown sugar
  • 3/4 teaspoon pure vanilla extract
  • 3/4 teaspoon Ener-G egg replacer mixed with 1 tablespoon rice milk
  • 2 tablespoons plus 3/4 teaspoon rice milk
  • 1/2 cup dairy-free, soy-free chocolate chips (Try Enjoy Life)


Directions:
  1. Preheat the oven to 350 degrees F. Line two baking sheets with parchment paper (or cooking spray).
  2. Whisk together the flour mix, xanthan gum, baking soda, cream of tartar, and salt.
  3. In the bowl of a stand mixer fitted with the paddle attachment, combine the shortening, granulated sugar, and brown sugar, mixing on medium speed until fluffy, about 2 minutes, and scraping down the sides of the bowl as necessary. Add the vanilla and egg replacer. Mix for 20 seconds.
  4. Add the flour mixture to the creamed batter in three batches, alternating with the rice milk, mixing on low speed and scraping down the sides of the bowl as necessary.
  5. Scoop out the dough by 2 teaspoonfuls and place on the baking sheets, 12 per sheet. Wet your hands with a little water and roll the doll into balls.
  6. Bake in the center of the oven for 5 minutes. Put the chocolate chips in a microwave-safe bowl and melt. This will take about 1 minute; check the chips halfway through and stir. Once the chips are melted, set them aside.
  7. Remove the cookies from the oven. Wet your thumb with cool water and, working quickly, make thumbprint marks in the center of each cookie. Fill the thumbprints with 1/2 teaspoon of melted chocolate.
  8. Return the cookies to the oven and bake an additional 5 to 6 minutes, or until set.
  9. Let the cookies cool for about 5 minutes on the baking sheets before transferring to a cooling rack.

What I thought:
These were so delicious. They tasted like donuts, though I haven't had donuts in who knows how long. They were even better once the chocolate hardened. I think these turned out a little thicker than the snickerdoodle cookies I made before because I used a different brand of flour. I've heard that Bob's Red Mill flours make it flat so I used a local grocer, Sprouts, for rice flour. It also depends on the type of pan, as you can see in my pictures. I also made way more than the recipe said I would make. Next time, I'd make them a little bigger because some turned out small. Anyways, these are super good and you should make them :)

Looking for something to make with the leftover melted chocolate?
Try some chocolate covered raisins, pretzels, bananas, or strawberries!
I just dipped some strawberries in the leftover melted rice milk chocolate and let them cool on a plate (but they stick, as you can see).


Enjoy!!

-Michelle

  • Digg
  • Del.icio.us
  • StumbleUpon
  • Reddit
  • RSS

French Puff Muffins

Hello everyone! I seem to be starting off my posts with this statement a lot lately: I'm sorry I haven't posted in so long! I've been super busy with school.
Also, GET THIS... I turned on my laptop the other day and the cord just went up in flames! Scared the crap outta me! So that's also a reason I haven't posted, because I was cordless. But I'm up and running now.
But don't worry, I've still been cooking up a storm!

I also wanted to say thank you to everyone for your support! I'm up to 530 views as of today.

Today I'm posting a recipe for yummy cinnamon sugar muffins out of The Food Allergy Mama's Baking Book by Kelly Rudnicki. It calls for all purpose flour but I used a gluten free flour mixture. I used 6 cups = 4 cups brown rice flour, 1 1/3 cups potato starch, and 2/3 cup tapioca starch/flour. You can also check out my replacements page for other gluten free mixes.

French Puff Muffins: Dairy, eggs, soy, nuts, fish, and wheat/gluten free.

Makes 12 muffins.

Ingredients

  • 2/3 cup dairy-free margarine
  • 1 tablespoon water
  • 1 cup granulated sugar
  • 3 cups unbleached all-purpose flour (Gluten free: see previous paragraph)
  • 3/4 teaspoon xanthan gum (if using gluten free flour)
  • 1 teaspoon salt
  • 1/2 teaspoon ground cinnamon
  • 1/8 teaspoon ground nutmeg
  • 3 teaspoons baking powder
  • 1 cup soy/rice/almond/hemp milk

Topping (you don't need this much): 1/2 cup melted dairy-free margarine, 1 cup granulated sugar, 2 teaspoons ground cinnamon

Directions
  1. Preheat oven to 350 degrees F, and spray a 12-cup muffin pan with dairy-free baking spray.
  2. To make the muffins, in the bowl of a stand mixer fitted with the paddle attachment, combine the 2/3 cup margarine, water, and 1 cup sugar.
  3. In a medium bowl, combine the flour, salt, 1/2 teaspoon cinnamon, nutmeg, and baking powder with a wire whisk.
  4. Add the flour mixture and "milk" to the margarine-sugar mixture by thirds, alternating between each addition.
  5. Using a cookie scooper, place the batter into the prepared muffin pans.
  6. Bake for 15 to 20 minutes, or until and inserted cake tester/toothpick comes out clean.
  7. To make the topping, combine the 1 cup sugar and 2 teaspoons cinnamon in a small bowl, and place the melted 1/2 cup margarine in a small bowl. Remove the muffins from the pan and dip each in margarine, and then roll each muffin top in the cinnamon-sugar mixture.

What I used: Earth Balance soy-free natural buttery spread, tap water, Great Value (Walmart) sugar, Sprouts (local grocery) brown rice flour, Bob's Red Mill potato and tapioca starches, Bob's Red Mill xanthan gum, Kroger salt, McCormick ground cinnamon and nutmeg, Great Value baking powder, Rice Dream rice milk

What I thought: These were super good! I found they were even better when rolling the whole muffin in the sugar mixture, instead of just the top. I also discovered not to add too much of the melted butter or else it becomes soggy (as you can see in the top left of the picture). So I buttered just the top and rolled the whole thing in the topping. I also tried rice milk "chocolate" chips to some of them and it was super good too. I can't think of anything bad to say.


Next time I'm posting Curry Pork and Rice so stay tuned (it was super tasty)!

Enjoy!

-Michelle

P.S. Check out the recipes posted on Sweet As Sugar Cookies' Blog to broaden your horizon on some tasty treats out there! (There are even some vegan ones)

  • Digg
  • Del.icio.us
  • StumbleUpon
  • Reddit
  • RSS

Blueberry Boy Bait

Hello! Happy February everyone! Valentine's Day is just around the corner, so make some Red Velvet Cake or Chocolate Maple Cupcakes for your sweetie!

Or some of this Blueberry Boy Bait to reign in those boys you just don't quite have yet! It's so good they can't resist. Honestly, this cake-like thing was gone within an hour at my house. My roomate Taryn literally asked me every five minutes if it was done cooling yet. I swear, my roomates and I each had three large slices (and some sneaked bites).

This recipe is from The Allergen-Free Baker's Handbook by Cybele Pascal.

Blueberry Boy Bait: Dairy, eggs, soy, nuts, fish, and gluten free!

Makes 8 servings in a 9 X 9 inch pan.

Ingredients:

  • 2 cups Basic Gluten-Free Flour Mix (6 cups = 4 cups superfine brown rice flour, 1 1/3 cups potato starch, 2/3 cup tapioca flour/starch)
  • 1/2 teaspoon xanthan gum
  • 1 tablespoon double-acting baking powder
  • 1 teaspoon salt
  • 3/4 cup dairy-free, soy-free vegetable shortening
  • 3/4 cup firmly packed light brown sugar
  • 1/2 cup granulated sugar
  • 4 1/2 teaspoons Ener-G egg replacer mixed with 6 tablespoons rice milk
  • 3/4 cup rice milk
  • 1 cup fresh or frozen blueberries tossed with 1 tablespoon Basic Gluten-Free Flour Mix
  • 1/4 cup granulated sugar mixed with 1/2 teaspoon ground cinnamon

Directions:
  1. Preheat the oven to 350 degrees F. Grease a 9 by 9-inch baking pan and sprinkle with a little gluten-free flour mix, tapping out any extra.
  2. Whisk together the flour mix, xanthan gum, baking powder, and salt. Set aside.
  3. In the bowl of a stand mixer fitted with the paddle attachment, combine the shortening, brown sugar, and granulated sugar. Mix on medium-high speed for 2 minutes, or until fluffy.
  4. Add the egg replacer and mix for about 20 seconds.
  5. Reduce the speed to medium and beat in one-third of the flour, mixing for 15 seconds.
  6. Add half of the rice milk, mixing for 20 seconds.
  7. Beat in half of the remaining flour, then the remaining rice milk, and finally the remaining flour mixture, scraping down the sides of the bowl as necessary.
  8. Add half of the batter to the pan, using a frosting spatula to spread the batter evenly across the bottom of the pan. Sprinkle with half of the blueberries. Top with the remaining batter, spreading it as evenly as possible across the blueberries. Top with the remaining blueberries, then sprinkle with the cinnamon-sugar mixture.
  9. Bake in the center of the oven for 1 hour, until the cinnamon-sguar mixture has begun to caramelize and the top is golden. Let cool in the pan for 30 minutes before turning out onto and serving platter (or just cut into pieces and serve out of the pan). Serve warm or at room temperature. This cake is even better on day two!


What I used: Bob's Red Mill flours, Bob's Red Mill xanthan gum, Great Value Walmart) baking powder, Kroger salt, Spectrum Organic All Vegetable Shortening (palm oil), 365 (Whole Foods) brown sugar, Great Value sugar, Ener-G Egg replacer, Rice Dream rice milk, Whole Foods blueberries, McCormick's cinnamon

What I thought: As I mentioned before, this was gone within the hour. I asked my roomates if they could think of anything bad about this and they couldn't think of one. So in other words, it's awesome and you should make it!

Do it!

-Michelle

  • Digg
  • Del.icio.us
  • StumbleUpon
  • Reddit
  • RSS

Banana-Chocolate Chip Muffins

Hey everyone! I decided to make banana chocolate chip muffins! In this recipe, it calls for all purpose flour but you can substitute a gluten free mix. I tried the one from Cybele Pascal and it turned out great!

This recipe is from The Food Allergy Mama's Baking Book by Kelly Rudnicki.

Banana-Chocolate Chip Muffins: Dairy, egg, soy, nut, fish, and gluten free.

Makes 12 muffins.

Ingredients:

  • 2 medium bananas, mash
  • 2 tablespoons water
  • 1/2 cup dairy-free margarine, melted
  • 1/4 cup dairy-free buttermilk (1/2 cup soy or rice milk mixed with 1 teaspoon white vinegar; let sit for 5-10 minutes)
  • 2 cups unbleached all-purpose flour (I used Cybele Pascal's gluten free mix: 6 cups = 4 cups superfine brown rice flour, 1 1/3 cups potato starch, 2/3 cup tapioca flour aka starch)
  • 2/3 cup granulated sugar
  • 1 1/2 teaspoons baking powder
  • 1 teaspoon baking soda
  • 1/4 teaspoon salt
  • 1/2 cup dairy-free mini chocolate chips (I used Enjoy Life rice milk bars chopped up)

Directions:
  1. Preheat oven to 375 degrees F, and spray a 12-cup muffin pan with dairy-free baking spray.
  2. In the bowl of a stand imxer fitted with the paddle attachment, combine the mashed banana, water, melted margarine, and buttermilk until well incorporated.
  3. In a medium bowl, combine the flour, sguar, baking powder, and baking soda with a wire whisk. Add the dry ingredients to the banana mixture, and mix well. Stir in the mini chocolate chips, and divide the batter evenly among the prepared muffin cups.
  4. Bake for 15 to 20 minutes, or until golden brown and an inserted cake tester comes out clean.

What I used: Whole Food's bananas, tap water, Earth Balance soy-free buttery spread, Rice Dream rice milk, Heinz white distilled vinegar, Bob's Red Mill flours, Great Value (Walmart) sugar, Great Value baking powder, Arm & Hammer baking soda, Great Value salt, Enjoy Life rice milk bars

What I thought: These turned out pretty good. I would definitely recommend eating them warm, heating them up if cold. That way the chocolate melts. These were super moist too.

Try them!

-Michelle

  • Digg
  • Del.icio.us
  • StumbleUpon
  • Reddit
  • RSS

Chocolate Maple Cupcakes

Hello readers!
Last night I made Chocolate Maple Cupcakes with Rice Milk Chocolate Ganache and they were a huge hit! My boyfriend devoured it even though he's not big on sweets or chocolate. One of my roomates said that it was the best thing I've made so far, and I probably have to agree, with Chicken Saltimbocca following.

This recipe is from The Allergen-Free Baker's Handbook by Cybele Pascal. If you haven't checked out her blog yet, you definitely should. She actually works with Enjoy Life (completely allergy free products, I love them!) and does videos. She records recipes that she makes and she also talks about allergies and tries to raise awareness through EmpowHER.com. So check out all those links!

Chocolate Maple Cupakes with Rice Milk Chocolate Ganache: Dairy, eggs, soy, nuts, fish, and wheat free.

Makes 12 cupcakes.

Cupcake Ingredients:

  • 2/3 cup rice milk
  • 1 teaspoon cider vinegar
  • 1 cup Basic Gluten-Free Flour Mix (Makes 6 cups: 4 cups superfine brown rice flour, 1 1/3 cups potato starch, 2/3 cup tapioca flour/starch; If you have a reaction to these ingredients, try a mix in my replacements post)
  • 1/2 cup unsweetened cocoa powder
  • 1/4 teaspoon plus 1/8 teaspoon xanthan gum
  • 3/4 teaspoon baking soda
  • 1/2 teaspoon double-acting baking powder
  • 1/4 teaspoon salt
  • 1/2 cup dairy-free, soy-free vegetable shortening (I like Spectrum, it's palm oil)
  • 2/3 cup maple syrup
  • 1 1/2 teaspoons pure vanilla extract

Cupcake Directions:
  1. Preheat the oven to 350 degrees F. Line a muffin pan with 12 liners
  2. Combine the rice milk and cider vinegar. Set aside.
  3. Whisk together the flour mix, cocoa powder, xanthan gum, baking soda, baking powder, and salt.
  4. In the bowl of a stand mixer fitted with the paddle attachment, cream the shortening on medium speed for about 1 minute. Add the maple syrup and vanilla, and beat for about 3 minutes, or until combined.
  5. Sift in the dry ingredients in three batches, alternating with the rice milk mixture, and beginning and ending with the dry ingredients. Beat until smooth, about 30 seconds, scraping down the sides of the bowl as necessary. Fill the liners about half full.
  6. Bake in the center of the oven for about 18 minutes, rotating the pan halfway through. Bake until a skewer/toothpick inserted into the center of a cupcake comes out clean.
  7. Transfer the cupcakes to a cooling rack and let cool completely before topping with the ganache. For easy cleanup, line a baking sheet with waxed paper or parchment paper and transfer the cupcakes to the baking sheet. I usually spread 1 teaspoon on each cupcake, then go back and top each with a second teaspoon, for a nice glossy, even layer (Be careful when eating them; everything was still very warm when I iced them so it was a big gooey chocolatey mess)

Frosting Ingredients (Ganache pronounced Guh-Nosh, I only know this from watching so much Cake Boss):
  • 4 Enjoy Life Rice Milk Boom Choco Boom bars (about six ounces total), or 1 cup dairy-free, soy-free chocolate chips (I only used three bars and I haven't been able to find any chocolate chips)
  • 1/4 cup rice milk
  • 2 tablespoons maple syrup or agave nectar
  • Pinch of salt
Frosting Directions:
  1. Chop the chocolate bars into small pieces using a serrated knife.
  2. Bring the rice milk to a simmer in a small saucepan over medium-high heat. Remove the pan from the heat and stir in the chopped chocolate, maple syrup, and salt.
  3. Whisk until smooth, about 1 minute. Let cool to room temperature before spreading or drizzling on cupcakes. If you want the ganache to set faster, place the glazed cupcakes in the fridge.

What I used: Rice Dream rice milk, Bragg's apple cider vinegar (I STILL can't pour this stuff without it spilling down the side of the bottle), Bob's Red Mill flours, Nestle Toll House cocoa powder, Bob's Red Mill xanthan gum, Arm & Hammer baking soda, Great Value (Walmart) baking powder, Kroger salt, Spectrum Organic all-vegetable shortening, 365 (Whole Foods) Grade A maple syrup, Kroger imitation vanilla extract, 3 Enjoy Life Rice Milk Boom Choco Boom bars

What I thought: These might have been the best cupcakes I've ever had. The only downside is that I iced them when everything was warm so the ganache frosting was quite messy (though I almost enjoyed it more; it was like a lava cake from Chili's). These were moist and the perfect amount of sweetness and chocolatey-ness. They disappeared quite fast. Everyone that has tried them has loved them!

Definitely make these!!


-Michelle


[Linked in Real Sustenance]

  • Digg
  • Del.icio.us
  • StumbleUpon
  • Reddit
  • RSS

Red Velvet Cake

First off, I wanted to start out by saying thanks to everyone who has taken the time to read this or even looked at it. I'm already over 350 views in just about two weeks.

I also encourage your feedback. I wanna know what you guys think! If you make something, let me know. If you have a recipe suggestion, let me know. If you want me to completely change stuff or adapt for another allergy, let me know! I want your feedback, even if it's bad.

If you only make one recipe from this blog, this is the one you want to make. It is awesome! My roomates have been munching down. This red velvet cake is very rich and flavorful. The pictures of it aren't the best but I promise it takes amazing.

This recipe is once again from The Allergen-Free Baker's Handbook by Cybele Pascal.

Red Velvet Cake with Velvet Frosting: Dairy, egg, soy, nut, fish, and wheat free.

Makes 1 8-inch two layer cake

Cake Ingredients:

  • 2 3/4 cups Gluten Flour mix (see last blog; 6 cups = 4 cups superfine brown rice flour, 1 1/3 cups potato starch, 2/3 cup tapioca flour; if you can't have that, try a mix in my replacements post)
  • 1/4 cup unsweetened cocoa powder
  • 3/4 teaspoon xanthan gum
  • 1 1/2 teaspoons baking soda
  • 1 1/2 taspoons salt
  • 1 1/2 cups rice milk
  • 1 1/2 teaspoons cider vinegar
  • 3/4 cup dairy-free, soy-free vegetable shortening
  • 1 1/2 cups granulated sugar
  • 4 1/2 teaspoons Ener-G egg replacer mixed with 6 tablespoons rice milk
  • 1 teaspoon pure vanilla extract
  • 1 (1-ounce) bottle red food coloring (we ran out so we added a few drops of purple)

Cake Directions:
  1. Preheat the oven to 350 degrees F. Grease two 8-inch round cake pans, line with cutout parchment paper, grease again, and dust with a little cocoa powder.
  2. Whisk together the flour mix, cocoa powder, xanthan gum, baking powder, baking soda, and salt. Set aside.
  3. Combine the rice milk and cider vinegar. Set aside.
  4. In the bowl of stand mixer fitted with the paddle attachment, combine the shortening, sugar, egg replacer, and vanilla. Beat on medium speed until light and fluffy, about 2 minutes. Add the food coloring and mix until combined, scraping down the sides of the bowl as necessary. Sift in the flour mixture in three batches, alternating with the rice milk mixture, and beginning and ending with the flour mixture. Beat until smooth, about 30 seconds, scraping down the sides of the bowl as necessary.
  5. Divide the batter between two pans, and smooth down the surface using a frosting spatula.
  6. Bake in the center of the oven for about 35 minutes, or until the cake is beginning to pull away from the sides of the pan and a akewer inserted into the center comes out clean. Rotate the pans halfway through the baking time.
  7. Let cool in the pans on a cooling rack for 30 minutes. Cover the cake pan with a large plate, flip, peel off the parchment paper, and flip the cake back onto the rack, right side up, to cool completely. Repeat with the other cake.
  8. Once the cakes have cooled completely, you may use a serrated knife to trim the tops to make them level. Frost with Velvet Frosting (following). Once the frosting has set, store covered at room temperature.

Frosting Ingredients:
  • 1 cup dairy-free, soy-free vegetable shortening
  • Pinch of salt
  • 3 cups confectioners'/powdered sugar
  • 3 tablespoons rice milk
  • 1 tablespoon lemon juice
  • 1 teaspoon pure vanilla extract

Frosting Directions:
  1. In the bowl of a stand mixer fitted with the paddle attachment, cream the shortening and salt on medium speed for 1 minute.
  2. Add the confectioners' sugar in three batches, beating after each addition.
  3. Add the rice milk, lemon juice, and vanilla. Beat on medium speed until smooth, creamy, and fluffy, about 5 minutes.


What I used: Bob's Red Mill gluten free flours, Nestle Toll House cocoa powder, Bob's Red Mill xanthan gum, Great Value (Walmart) baking powder, Arm & Hammer baking soda, Great Value salt, Rice Dream rice milk, Bragg's apple cider vinegar, Spectrum organic all vegetable shortening (palm oil), Great Value sugar, Ener-G egg replacer, Kroger vanilla extract, McCormick food colors, 365 (Whole Foods) powdered sugar, ReaLemon lemon juice

What I thought: This was one of the best cakes I've ever tried, let alone baked. The only problems that arose were that we iced it too soon so the icing pulled off cake chunks and that the icing recipe didn't make enough. We made two batches of the icing and still didn't have enough. The icing was very rich and we added too much, especially in the center. But other than those minor issues, it's an awesome cake.

Make it!!

-Michelle

  • Digg
  • Del.icio.us
  • StumbleUpon
  • Reddit
  • RSS

Snickerdoodles

Hello! Today I'm posting a recipe for snickerdoodles!

This recipe is from The Allergen-Free Baker's Handbook by Cybele Pascal. This has become my baker's handbook for real. This cookbook is awesome. I've become such a huge fan of baking.

To make this, you need to make a mixture of flours first. You won't need all of it, so store it for another use.

Flour mixture (makes 6 cups):
4 cups superfine brown rice flour
1 1/3 cups potato starch (not potato flour)
2/3 cup tapioca flour (aka tapioca starch)


Snickerdoodles: Dairy, egg, wheat, fish, soy, and nut free.

Ingredients:

  • 2 1/2 cups plus 2 tablespoons flour mixture (use the one above or your own mixture; see flour replacement mixtures on the replacements post)
  • 1/2 teaspoon plus 1/8 teaspoon xanthan gum
  • 3/4 teaspoon baking soda
  • 1 1/2 teaspoons cream of tartar
  • 1/4 teaspoon salt
  • 3/4 cup dairy-free, soy-free vegetable shortening (I like Spectrum)
  • 3/4 cup granulated sugar
  • 1/4 cup plus 2 tablespoons firmly packed brown sugar
  • 2 teaspoons pure vanilla extract
  • 1 1/2 teaspoons Ener-G egg replacer mixed with 2 tablespoons rice milk
  • 1/4 cup plus 1 teaspoon rice milk
  • 2 tablespoons granulated sugar mixed with 2 teaspoons ground cinnamon (I feel that this was too much cinnamon; try just 1 teaspoon)

Directions:
  1. Preheat the oven to 375 degrees F. Line two baking sheets with parchment paper (I tried spray canola oil and they still stuck).
  2. Whisk together the flour mix, xanthan gum, baking soda, cream of tartar, and salt.
  3. In the bowl of a stand mixer fitted with the paddle attachment, combine the shortening, granulated sugar, and brown sugar, mixing on medium speed until fluffy, about 2 minutes. Add the vanilla and egg replacer. Mix for 20 seconds.
  4. Add the flour mixture in two bathces, mixing on low speed, alternating with the rice milk, and scraping down the sides of the bowl as necessary.
  5. Roll the dough into 24 heaping tablespoon-size balls (1 1/2 inches in diameter). Roll the balls in the cinnamon-sugar mixture until coated on all sides.
  6. Place on the baking sheets 3 inches apart. Bake for 10 minutes in the center of the oven. Let cool for 10 minutes on the baking sheets before transferring to a cooling rack.

What I used: Mixture of Bob's Red Mill flours, Bob's Red Mill xanthan gum, Arm & Hammer baking soda, McCormick's cream of tartar, Great Value (Walmart) salt, Spectrum Organic All Vegetable shortening (they use palm oil), Great Value sugar, 365 (Whole Foods) brown sugar, Kroger vanilla, Ener-G egg replacer, Rice Dream, McCormick's cinnamon

What I thought: These cookies were alright. Mine turned out super flat, nothing at all like the picture in the cookbook. I think part of it could have been because of the high altitude, but it could have been that I didn't take them out soon enough. Once they cooled, they were pretty hard. I also thought they had too much cinnamon on the outside. If you're not allergic to wheat, I would try going with just all purpose flour. I think they were flat due to the lack of gluten. If you're at a high altitude, you could try lessening the baking soda. Other than being flat and hard, they were pretty good.

Make some adjustments if you want, give it a try, and let me know how they turn out!

Enjoy!

Michelle

P.S. Next I'm posting a red velvet cake - so stay tuned!

  • Digg
  • Del.icio.us
  • StumbleUpon
  • Reddit
  • RSS

Nut Butter Cookies

Hello again!

I decided to make some almond butter cookies because I was really missing some peanut butter ones. This recipe is from The Food Allergy Mama's Baking Book by Kelly Rudnicki. I like this recipe because you can choose which "nut" butter you want based on your allergy. The recipe calls for soy nut butter but because I'm allergic to soy, I decided on almond butter.

I'm going to warn you guys that my picture of the cookies sucks. By the time I remembered to take a picture, my roomates had already eaten the good cookies! So I had to take a picture of the few remaining half burned ones.

Nut Butter Cookies: Dairy, eggs, and fish free. Can be wheat free with some adjustment. Can be peanut, tree nut, soy free, or all three depending on your choice of "nut" butter.

Makes 2 dozen cookies

Ingredients

  • 1/2 cup dairy-free shortening
  • 1/2 cup creamy soy nut butter (Can be peanut, almond, cashew, sunflower, or any other nut butter of your choice depending on allergies)
  • 1/2 cup granulated sugar
  • 1/2 cup brown sugar
  • 1/4 cup unsweetened applesauce
  • 1 1/2 cups unbleached all-purpose flour (Wheat free: try a gluten free all purpose mix; try a mixture of flours I posted in the replacements post)
  • 1/2 teaspoon baking powder
  • 3/4 teaspoon baking soda
  • 1/4 teaspoon salt

Directions
  1. In the bowl of a stand mixer fitted with the paddle attachment, thoroughly combine the shortening, nut butter, sugars, and applesauce (I just use an electric mixer or a whisk).
  2. In a separate medium mixing bowl, combine the flour, baking powder, baking soda, and salt with a wire whisk.
  3. Add the flour mixture to the shortening mixture, and stir until just combined.
  4. Chill the dough for 1 hour.
  5. Preheat the oven to 375 degrees F, and line 2 baking sheets with parchment paper (I just sprayed with soy-free canola spray).
  6. Using your hands, shape the dough into 1-inch balls, and place the balls onto the baking sheets. Dip a fork into some flour, and press the fork tines into each dough ball twice, making a crisscross design.
  7. Bake for 12 to 14 minutes, or until light brown.
  8. Cool completely on baking sheets.

What I used: Great Value (Walmart) shortening, MaraNatha almond butter, Great Value granulated sugar, 365 (Whole Foods) brown sugar, Great Value cinnamon applesauce, Great Value bleached enriched all purpose flour, Great Value baking powder, Arm & Hammer baking soda, Great Value salt

What I thought: These cookies were so delicious. As I mentioned before, they disappeared into my roomates' mouths very quickly. I was very nervous after mixing them because they were so dry. I remember baking peanut butter cookies when I was younger and they were definitely more moist. So I followed the directions and hoped for the best. But they turned out to be great! They were a little flat (most likely due to the altitude) but that was the only downside.

You should definitely try these!

-Michelle

  • Digg
  • Del.icio.us
  • StumbleUpon
  • Reddit
  • RSS

Chewy Double Chocolate Cookies

Hey everyone!
So I kinda jumped the gun and tried the chewy double chocolate cookies before the poll was even over. so I'm going to post this one and the next one will be the winner, the chicken!

This recipe is from The Food Allergy Mama's Baking Book by Kelly Rudnicki.

Chewy Double Chocolate Cookies: Dairy, egg, nut, fish, and soy free. Can be wheat free with some adjustment.

Ingredients

  • 2/3 cup dairy-free margarine (Try Earth Balance)
  • 1 cup granulated sugar
  • 1/4 cup unsweetened applesauce
  • 2/3 cup dairy-free buttermilk (1 cup soy/rice/almond/coconut milk mixed with 1 tablespoon white vinegar; let sit for 5-10 minutes)
  • 1 teaspoon vanilla extract
  • 2 cups unbleached all-purpose flour (Gluten free: Try gluten free all purpose flour mixes, can be found at Whole foods)
  • 1/2 cup cocoa powder
  • 1/2 teaspoon baking soda
  • 1/2 taspoon salt
  • 1 cup dairy-free mini chocolate chips (Try Enjoy Life rice milk chips)


Directions
  1. In the bowl of a stand mixer fitted with the paddle attachment, combine the margarine, sugar, applesauce, buttermilk, and vanilla.
  2. In a separate medium bowl, combine the flour, cocoa powder, bakinf soda, and salt with a wire whisk.
  3. Add the flour mixture to the margarine mixture, and mix on low for about 1 minute to combine.
  4. Increase the speed to medium high and beat for 2 to 3 more minutes.
  5. Preheat oven to 400 degrees F and line a baking sheet with parchment paper (or cooking spray, soy free).
  6. Use a cookie scooper to place the dough onto the baking sheet. Bake for 7 to 10 minutes, or until set.
  7. Cool completely on the baking sheet.

What I used: Earth Balance soy free buttery spread, Great Value (Walmart) sugar, Great Value cinnamon applesauce, Rice Dream and Heinz distilled white vinegar, Kroger vanilla, Great Value bleached all purpose flour, Nestle Toll House cocoa, Arm & Hammer baking soda, Great Value salt, Enjoy Life rice milk bars (crushed; I forgot to include them in the picture)

What I thought: These cookies were pretty tasty. They turned out to be very puffy, which is surprising because of the altitude. They were also darker than I thought even though I used bleached flour. Unfortunately, this recipe isn't gluten free. I'm doing a bad job at making gluten free once so I'll try and do better!

Enjoy!
-Michelle

  • Digg
  • Del.icio.us
  • StumbleUpon
  • Reddit
  • RSS