Chocolate Maple Cupcakes

Hello readers!
Last night I made Chocolate Maple Cupcakes with Rice Milk Chocolate Ganache and they were a huge hit! My boyfriend devoured it even though he's not big on sweets or chocolate. One of my roomates said that it was the best thing I've made so far, and I probably have to agree, with Chicken Saltimbocca following.

This recipe is from The Allergen-Free Baker's Handbook by Cybele Pascal. If you haven't checked out her blog yet, you definitely should. She actually works with Enjoy Life (completely allergy free products, I love them!) and does videos. She records recipes that she makes and she also talks about allergies and tries to raise awareness through EmpowHER.com. So check out all those links!

Chocolate Maple Cupakes with Rice Milk Chocolate Ganache: Dairy, eggs, soy, nuts, fish, and wheat free.

Makes 12 cupcakes.

Cupcake Ingredients:

  • 2/3 cup rice milk
  • 1 teaspoon cider vinegar
  • 1 cup Basic Gluten-Free Flour Mix (Makes 6 cups: 4 cups superfine brown rice flour, 1 1/3 cups potato starch, 2/3 cup tapioca flour/starch; If you have a reaction to these ingredients, try a mix in my replacements post)
  • 1/2 cup unsweetened cocoa powder
  • 1/4 teaspoon plus 1/8 teaspoon xanthan gum
  • 3/4 teaspoon baking soda
  • 1/2 teaspoon double-acting baking powder
  • 1/4 teaspoon salt
  • 1/2 cup dairy-free, soy-free vegetable shortening (I like Spectrum, it's palm oil)
  • 2/3 cup maple syrup
  • 1 1/2 teaspoons pure vanilla extract

Cupcake Directions:
  1. Preheat the oven to 350 degrees F. Line a muffin pan with 12 liners
  2. Combine the rice milk and cider vinegar. Set aside.
  3. Whisk together the flour mix, cocoa powder, xanthan gum, baking soda, baking powder, and salt.
  4. In the bowl of a stand mixer fitted with the paddle attachment, cream the shortening on medium speed for about 1 minute. Add the maple syrup and vanilla, and beat for about 3 minutes, or until combined.
  5. Sift in the dry ingredients in three batches, alternating with the rice milk mixture, and beginning and ending with the dry ingredients. Beat until smooth, about 30 seconds, scraping down the sides of the bowl as necessary. Fill the liners about half full.
  6. Bake in the center of the oven for about 18 minutes, rotating the pan halfway through. Bake until a skewer/toothpick inserted into the center of a cupcake comes out clean.
  7. Transfer the cupcakes to a cooling rack and let cool completely before topping with the ganache. For easy cleanup, line a baking sheet with waxed paper or parchment paper and transfer the cupcakes to the baking sheet. I usually spread 1 teaspoon on each cupcake, then go back and top each with a second teaspoon, for a nice glossy, even layer (Be careful when eating them; everything was still very warm when I iced them so it was a big gooey chocolatey mess)

Frosting Ingredients (Ganache pronounced Guh-Nosh, I only know this from watching so much Cake Boss):
  • 4 Enjoy Life Rice Milk Boom Choco Boom bars (about six ounces total), or 1 cup dairy-free, soy-free chocolate chips (I only used three bars and I haven't been able to find any chocolate chips)
  • 1/4 cup rice milk
  • 2 tablespoons maple syrup or agave nectar
  • Pinch of salt
Frosting Directions:
  1. Chop the chocolate bars into small pieces using a serrated knife.
  2. Bring the rice milk to a simmer in a small saucepan over medium-high heat. Remove the pan from the heat and stir in the chopped chocolate, maple syrup, and salt.
  3. Whisk until smooth, about 1 minute. Let cool to room temperature before spreading or drizzling on cupcakes. If you want the ganache to set faster, place the glazed cupcakes in the fridge.

What I used: Rice Dream rice milk, Bragg's apple cider vinegar (I STILL can't pour this stuff without it spilling down the side of the bottle), Bob's Red Mill flours, Nestle Toll House cocoa powder, Bob's Red Mill xanthan gum, Arm & Hammer baking soda, Great Value (Walmart) baking powder, Kroger salt, Spectrum Organic all-vegetable shortening, 365 (Whole Foods) Grade A maple syrup, Kroger imitation vanilla extract, 3 Enjoy Life Rice Milk Boom Choco Boom bars

What I thought: These might have been the best cupcakes I've ever had. The only downside is that I iced them when everything was warm so the ganache frosting was quite messy (though I almost enjoyed it more; it was like a lava cake from Chili's). These were moist and the perfect amount of sweetness and chocolatey-ness. They disappeared quite fast. Everyone that has tried them has loved them!

Definitely make these!!


-Michelle


[Linked in Real Sustenance]

  • Digg
  • Del.icio.us
  • StumbleUpon
  • Reddit
  • RSS

Chicken Saltimbocca

First of all, I wanted to say thanks again for reading my blog! I'm up to 400 views now!

This recipe is from Allergy-Free Cookbook by many authors. This is one of the best chicken recipes I've tried! It was relatively easy and tastes amazing.

Chicken Saltimbocca: Dairy, eggs, soy, nuts, fish, and wheat free.

Makes 4 servings.

Ingredients:

  • 1/4 cup fresh basil leaves, coarsely chopped
  • 2 tablespoons chopped fresh chives
  • 2 teaspoons extra virgin olive oil
  • 1 clove garlic, minced (1/2 teaspoon)
  • 1/2 teaspoon dried oregano
  • 1/2 teaspoon dried sage
  • 4 boneless skinless chicken breasts
  • 2 slices smoked ham, cut in half
  • 1/2 cup chicken broth
  • 1 cup pasta sauce (check labels for soy)


Directions:
  1. Combine basil, chives, oil, garlic, oregano and sage in a small bowl.
  2. Lightly pound chicken breasts between 2 pieces of plastic wrap with flat side of meat mallet to 1/2 - 1/4 inch thickness.
  3. Spread one quarter of herb mixture over each chicken breast.
  4. Place ham slice over herb mixture; roll up to enclose filling. Secure with toothpicks.
  5. Spray medium nonstick skillet with cooking spray (watch out for soy). Heat skillet over medium-high heat. Cook chicken breasts, seam side up, 2 to 3 minutes or until browned. Turn chicken; cook 2 to 3 minutes or until browned on all sides (Repeat turning to brown all sides). Add broth; reduce heat to medium-low. Cover and simmer 20 to 25 minutes or until chicken is cooked through.
  6. Remove chicken to cutting board, leaving liquid in skillet. Let chicken cool 5 minutes. Add pasta sauce to skillet; cook over medium-low heat 2 to 3 minutes or until heated through, stirring occasionally.
  7. Remove toothpicks from chicken and cut crosswise into slices. Serve chicken topped with pasta sauce.

What I used: McCormick basil leaves, McCormick Gormet Collection chopped chives, 365 (Whole Foods) extra virgin olive oil, Spice World minced garlic, McCormick oregano leaves, McCormick ground sage, Tyson chicken breast tenderloins, Hormet Natural Choice deli ham, Swanson chicken broth, Muir Glen tomato basil sauce

What I thought: This chicken was amazing!! One of my favorite recipes by far. The only downside was that I didn't make enough!! I used all dried stuff instead of fresh. I also didn't try to flatten the chicken (it would have been easier to roll up if I had). I also didn't use all of the spice mixture on the four I made. My pictures are slightly different than the cookbook because I used tenderloins because they are the perfect size for one, instead of breasts and cutting them in half. The pasta sauce definitely topped it off!

Make this chicken!!

-Michelle

  • Digg
  • Del.icio.us
  • StumbleUpon
  • Reddit
  • RSS

Red Velvet Cake

First off, I wanted to start out by saying thanks to everyone who has taken the time to read this or even looked at it. I'm already over 350 views in just about two weeks.

I also encourage your feedback. I wanna know what you guys think! If you make something, let me know. If you have a recipe suggestion, let me know. If you want me to completely change stuff or adapt for another allergy, let me know! I want your feedback, even if it's bad.

If you only make one recipe from this blog, this is the one you want to make. It is awesome! My roomates have been munching down. This red velvet cake is very rich and flavorful. The pictures of it aren't the best but I promise it takes amazing.

This recipe is once again from The Allergen-Free Baker's Handbook by Cybele Pascal.

Red Velvet Cake with Velvet Frosting: Dairy, egg, soy, nut, fish, and wheat free.

Makes 1 8-inch two layer cake

Cake Ingredients:

  • 2 3/4 cups Gluten Flour mix (see last blog; 6 cups = 4 cups superfine brown rice flour, 1 1/3 cups potato starch, 2/3 cup tapioca flour; if you can't have that, try a mix in my replacements post)
  • 1/4 cup unsweetened cocoa powder
  • 3/4 teaspoon xanthan gum
  • 1 1/2 teaspoons baking soda
  • 1 1/2 taspoons salt
  • 1 1/2 cups rice milk
  • 1 1/2 teaspoons cider vinegar
  • 3/4 cup dairy-free, soy-free vegetable shortening
  • 1 1/2 cups granulated sugar
  • 4 1/2 teaspoons Ener-G egg replacer mixed with 6 tablespoons rice milk
  • 1 teaspoon pure vanilla extract
  • 1 (1-ounce) bottle red food coloring (we ran out so we added a few drops of purple)

Cake Directions:
  1. Preheat the oven to 350 degrees F. Grease two 8-inch round cake pans, line with cutout parchment paper, grease again, and dust with a little cocoa powder.
  2. Whisk together the flour mix, cocoa powder, xanthan gum, baking powder, baking soda, and salt. Set aside.
  3. Combine the rice milk and cider vinegar. Set aside.
  4. In the bowl of stand mixer fitted with the paddle attachment, combine the shortening, sugar, egg replacer, and vanilla. Beat on medium speed until light and fluffy, about 2 minutes. Add the food coloring and mix until combined, scraping down the sides of the bowl as necessary. Sift in the flour mixture in three batches, alternating with the rice milk mixture, and beginning and ending with the flour mixture. Beat until smooth, about 30 seconds, scraping down the sides of the bowl as necessary.
  5. Divide the batter between two pans, and smooth down the surface using a frosting spatula.
  6. Bake in the center of the oven for about 35 minutes, or until the cake is beginning to pull away from the sides of the pan and a akewer inserted into the center comes out clean. Rotate the pans halfway through the baking time.
  7. Let cool in the pans on a cooling rack for 30 minutes. Cover the cake pan with a large plate, flip, peel off the parchment paper, and flip the cake back onto the rack, right side up, to cool completely. Repeat with the other cake.
  8. Once the cakes have cooled completely, you may use a serrated knife to trim the tops to make them level. Frost with Velvet Frosting (following). Once the frosting has set, store covered at room temperature.

Frosting Ingredients:
  • 1 cup dairy-free, soy-free vegetable shortening
  • Pinch of salt
  • 3 cups confectioners'/powdered sugar
  • 3 tablespoons rice milk
  • 1 tablespoon lemon juice
  • 1 teaspoon pure vanilla extract

Frosting Directions:
  1. In the bowl of a stand mixer fitted with the paddle attachment, cream the shortening and salt on medium speed for 1 minute.
  2. Add the confectioners' sugar in three batches, beating after each addition.
  3. Add the rice milk, lemon juice, and vanilla. Beat on medium speed until smooth, creamy, and fluffy, about 5 minutes.


What I used: Bob's Red Mill gluten free flours, Nestle Toll House cocoa powder, Bob's Red Mill xanthan gum, Great Value (Walmart) baking powder, Arm & Hammer baking soda, Great Value salt, Rice Dream rice milk, Bragg's apple cider vinegar, Spectrum organic all vegetable shortening (palm oil), Great Value sugar, Ener-G egg replacer, Kroger vanilla extract, McCormick food colors, 365 (Whole Foods) powdered sugar, ReaLemon lemon juice

What I thought: This was one of the best cakes I've ever tried, let alone baked. The only problems that arose were that we iced it too soon so the icing pulled off cake chunks and that the icing recipe didn't make enough. We made two batches of the icing and still didn't have enough. The icing was very rich and we added too much, especially in the center. But other than those minor issues, it's an awesome cake.

Make it!!

-Michelle

  • Digg
  • Del.icio.us
  • StumbleUpon
  • Reddit
  • RSS

Snickerdoodles

Hello! Today I'm posting a recipe for snickerdoodles!

This recipe is from The Allergen-Free Baker's Handbook by Cybele Pascal. This has become my baker's handbook for real. This cookbook is awesome. I've become such a huge fan of baking.

To make this, you need to make a mixture of flours first. You won't need all of it, so store it for another use.

Flour mixture (makes 6 cups):
4 cups superfine brown rice flour
1 1/3 cups potato starch (not potato flour)
2/3 cup tapioca flour (aka tapioca starch)


Snickerdoodles: Dairy, egg, wheat, fish, soy, and nut free.

Ingredients:

  • 2 1/2 cups plus 2 tablespoons flour mixture (use the one above or your own mixture; see flour replacement mixtures on the replacements post)
  • 1/2 teaspoon plus 1/8 teaspoon xanthan gum
  • 3/4 teaspoon baking soda
  • 1 1/2 teaspoons cream of tartar
  • 1/4 teaspoon salt
  • 3/4 cup dairy-free, soy-free vegetable shortening (I like Spectrum)
  • 3/4 cup granulated sugar
  • 1/4 cup plus 2 tablespoons firmly packed brown sugar
  • 2 teaspoons pure vanilla extract
  • 1 1/2 teaspoons Ener-G egg replacer mixed with 2 tablespoons rice milk
  • 1/4 cup plus 1 teaspoon rice milk
  • 2 tablespoons granulated sugar mixed with 2 teaspoons ground cinnamon (I feel that this was too much cinnamon; try just 1 teaspoon)

Directions:
  1. Preheat the oven to 375 degrees F. Line two baking sheets with parchment paper (I tried spray canola oil and they still stuck).
  2. Whisk together the flour mix, xanthan gum, baking soda, cream of tartar, and salt.
  3. In the bowl of a stand mixer fitted with the paddle attachment, combine the shortening, granulated sugar, and brown sugar, mixing on medium speed until fluffy, about 2 minutes. Add the vanilla and egg replacer. Mix for 20 seconds.
  4. Add the flour mixture in two bathces, mixing on low speed, alternating with the rice milk, and scraping down the sides of the bowl as necessary.
  5. Roll the dough into 24 heaping tablespoon-size balls (1 1/2 inches in diameter). Roll the balls in the cinnamon-sugar mixture until coated on all sides.
  6. Place on the baking sheets 3 inches apart. Bake for 10 minutes in the center of the oven. Let cool for 10 minutes on the baking sheets before transferring to a cooling rack.

What I used: Mixture of Bob's Red Mill flours, Bob's Red Mill xanthan gum, Arm & Hammer baking soda, McCormick's cream of tartar, Great Value (Walmart) salt, Spectrum Organic All Vegetable shortening (they use palm oil), Great Value sugar, 365 (Whole Foods) brown sugar, Kroger vanilla, Ener-G egg replacer, Rice Dream, McCormick's cinnamon

What I thought: These cookies were alright. Mine turned out super flat, nothing at all like the picture in the cookbook. I think part of it could have been because of the high altitude, but it could have been that I didn't take them out soon enough. Once they cooled, they were pretty hard. I also thought they had too much cinnamon on the outside. If you're not allergic to wheat, I would try going with just all purpose flour. I think they were flat due to the lack of gluten. If you're at a high altitude, you could try lessening the baking soda. Other than being flat and hard, they were pretty good.

Make some adjustments if you want, give it a try, and let me know how they turn out!

Enjoy!

Michelle

P.S. Next I'm posting a red velvet cake - so stay tuned!

  • Digg
  • Del.icio.us
  • StumbleUpon
  • Reddit
  • RSS

Nut Butter Cookies

Hello again!

I decided to make some almond butter cookies because I was really missing some peanut butter ones. This recipe is from The Food Allergy Mama's Baking Book by Kelly Rudnicki. I like this recipe because you can choose which "nut" butter you want based on your allergy. The recipe calls for soy nut butter but because I'm allergic to soy, I decided on almond butter.

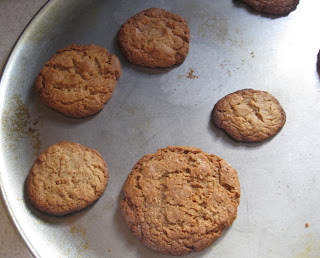
I'm going to warn you guys that my picture of the cookies sucks. By the time I remembered to take a picture, my roomates had already eaten the good cookies! So I had to take a picture of the few remaining half burned ones.

Nut Butter Cookies: Dairy, eggs, and fish free. Can be wheat free with some adjustment. Can be peanut, tree nut, soy free, or all three depending on your choice of "nut" butter.

Makes 2 dozen cookies

Ingredients

  • 1/2 cup dairy-free shortening
  • 1/2 cup creamy soy nut butter (Can be peanut, almond, cashew, sunflower, or any other nut butter of your choice depending on allergies)
  • 1/2 cup granulated sugar
  • 1/2 cup brown sugar
  • 1/4 cup unsweetened applesauce
  • 1 1/2 cups unbleached all-purpose flour (Wheat free: try a gluten free all purpose mix; try a mixture of flours I posted in the replacements post)
  • 1/2 teaspoon baking powder
  • 3/4 teaspoon baking soda
  • 1/4 teaspoon salt

Directions
  1. In the bowl of a stand mixer fitted with the paddle attachment, thoroughly combine the shortening, nut butter, sugars, and applesauce (I just use an electric mixer or a whisk).
  2. In a separate medium mixing bowl, combine the flour, baking powder, baking soda, and salt with a wire whisk.
  3. Add the flour mixture to the shortening mixture, and stir until just combined.
  4. Chill the dough for 1 hour.
  5. Preheat the oven to 375 degrees F, and line 2 baking sheets with parchment paper (I just sprayed with soy-free canola spray).
  6. Using your hands, shape the dough into 1-inch balls, and place the balls onto the baking sheets. Dip a fork into some flour, and press the fork tines into each dough ball twice, making a crisscross design.
  7. Bake for 12 to 14 minutes, or until light brown.
  8. Cool completely on baking sheets.

What I used: Great Value (Walmart) shortening, MaraNatha almond butter, Great Value granulated sugar, 365 (Whole Foods) brown sugar, Great Value cinnamon applesauce, Great Value bleached enriched all purpose flour, Great Value baking powder, Arm & Hammer baking soda, Great Value salt

What I thought: These cookies were so delicious. As I mentioned before, they disappeared into my roomates' mouths very quickly. I was very nervous after mixing them because they were so dry. I remember baking peanut butter cookies when I was younger and they were definitely more moist. So I followed the directions and hoped for the best. But they turned out to be great! They were a little flat (most likely due to the altitude) but that was the only downside.

You should definitely try these!

-Michelle

  • Digg
  • Del.icio.us
  • StumbleUpon
  • Reddit
  • RSS

Flourless Fried Chicken Tenders

Hey everyone! I know I haven't written in awhile, I'm sorry!

I promised you guys I'd make cornmeal crusted chicken, but when I was ready to make it, I read the directions and saw that the chicken had to soak for many hours and I didn't have the time. So instead I made flourless fried chicken tenders.

This recipe is from Allergy Free Cookbook which has too many authors to list.

Flourless Fried Chicken Tenders: Dairy, egg, soy, wheat, fish, and nut free.

Ingredients
  • 1 1/2 cups chickpea/garbanzo flour (Or your choice; I used white rice flour because of allergies)
  • 1 1/2 teaspoons Italian seasoning (Check labels for soy)
  • 1 teaspoon salt
  • 1/2 teaspoon black pepper
  • 1/8 teaspoon ground red pepper
  • 3/4 cup plus 2 tablespoons water
  • Oil for frying (I used canola; vegetable oil has soy so check labels)
  • 1 pound chicken tenders, cut in half if large
  • Curry Mayo Dipping Sauce (Optional; combine 1/2 cup mayo, 1/4 cup sour cream, 1/2 teaspoon curry powder in small bowl. Stir in 2 tablespoons minced fresh cilantro)

Directions

  1. Sift chickpea flour into medium bowl. Stir in Italian seasoning, salt, black pepper and red pepper. Gradually whisk in 3/4 cup water to make smooth batter. Whisk in additional water by tablespoons if needed until batter is consistency of heavy cream.
  2. Meanwhile, add oil to a large heavy skillet or Dutch oven to 3/4 inch depth. Heat over medium-high heat until drop of batter placed in oil sizzles (350 degrees F)
  3. Pat chicken pieces dry. Dip pices into batter with tongs; let excess fall back into bowl. Ease chicken gently into oil; fry 2 to 3 minutes per side until slightly browned and chicken is cooked through. Fry in batches; do not crowd pan. Drain on paper towels. Serve warm with Curry Mayo Dipping Sauce if desired.

What I used: Bob's Red Mill white rice flour, 5th Season Italian seasoning, Great Value (Walmart) salt, Great Value black pepper, McCormick's ground red pepper (cayenne), tap water, Great Value canola oil, Tyson chicken breast tenderloins

What I thought: These were awesome! They came out very crunchy and I like them a little softer. I found out that once they're reheated, though, the crust softens up a little. The only real downside I found was that the coating didn't really stick to the chicken once you cut into them. It could have been because I used a different flour than the recipe asked for, but I loved the flavor of the white rice flour. It could have used a little more seasoning though. But overall, these were very good. We also made our own french fries in the oil after we were done with the chicken. It was a great meal!

Enjoy!!

-Michelle


[Want other gluten free recipes? Check out Real Sustenance]

  • Digg
  • Del.icio.us
  • StumbleUpon
  • Reddit
  • RSS

Hot Cocoa

Hello all! I know I promised I would make the cornmeal crusted chicken next but I didn't. I'm sorry! But I will try to make it today since I'm off.

Today I'm posting a hot cocoa recipe from The Food Allergy Mama's Baking Book by Kelly Rudnicki.

Hot Cocoa: Dairy, egg, nut, wheat, soy, and fish free.

Makes 4 servings.

Ingredients
  • 1/3 cup unsweetened cocoa powder
  • 1/3 cup granulated sugar
  • 1/2 cup water
  • 3 1/2 cups milk of your choice (Soy, rice, almond, coconut)
  • Large allergen-free marshmallows, for topping (Optional; Rudnicki suggests Kraft Jet-Puffed)

Directions
1. In a medium saucepan, whisk together the cocoa powder and sugar over medium-low heat.
2. Stir in the water, and bring the mixture to a boil, stirring constantly.
3. Add the milk.
4. Reduce heat, and simmer for 5 minutes.
5. Serve with the large allergen-free marshmallows.

What I used: Nestle Toll House cocoa powder, Great Value (Walmart) granulated sugar, tap water, Silk PureAlmond vanilla almond milk

What I thought: I've been wanting to try this recipe for awhile because it's been so cold. I thought it was almost too thick and flavorful. I added some more water and that definitely made it better. I think next time I'll try rice milk because almond milk's thickness. Otherwise, it was pretty good. It makes A LOT however. I only wanted one mug-full and it made at least 4 or 5. Overall, it would be very good with a few minor adjustments.

Enjoy!

-Michelle

  • Digg
  • Del.icio.us
  • StumbleUpon
  • Reddit
  • RSS